Showing posts with label ChiChi. Show all posts

Monday, February 17, 2014

Neon Nails using ChiChi polish


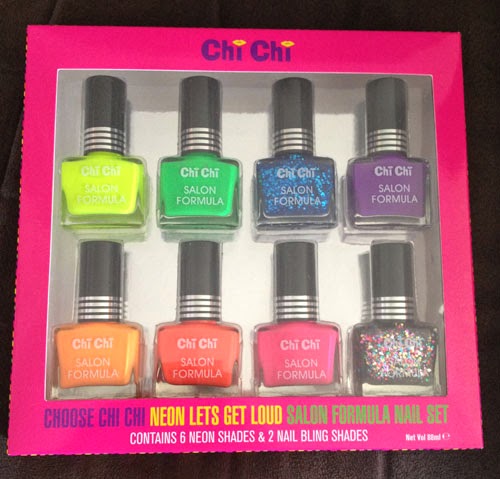
These nails were a lot of fun and so simple. The best tip I can give you with using neon colour nail polish is to put a coat of white nail polish on first and then put the neon colour on over the white. It makes the colour more vibrant. I used a toothpick to pick out the little bits of glitter and positioned them around my nails. I used the nail polish set below to create both the designs in this post.


With this mani I painted some white nail polish on first using the Sinful Colors I'm holding in the picture, then I picked 5 of the colours above and simply painted one side with one colour and continued it along to all the other fingers and the other colours.


What manicure are you wearing at the moment?


Saturday, January 11, 2014

Happy 2014!

First post for 2014! I hope you had a lovely Christmas and New Years and enjoyed your break (If you had one) I thought I would share some manis done over 2013 that I never got round to posting.

Spots & Glitter French tips
I wasn't as happy with these nails, because they didn't turn out how I imagined them in my head.
Simple french tips, which I then used a dotting tool to dot on the pink spots and swiped a bit of silver glitter on top of the tips.

Love nails
These nails were simple and cute.
Painted white nails with love written on the ring finger and a little red heart on the middle finger

Purple, Blue & Flocking Powder nails
Have a look at one of my previous posts about using flocking powder

What manis have you done lately?


Friday, October 11, 2013

Happy Cucpcake Nails

A while back I saw these adorable nails by The Crafty Ninja and thought they would be awesome to re-create. Check out her post to see how she did hers and see how I did mine below.


They weren't as difficult as I thought they would be, but I found that my black nail polish was getting a bit stringy so that ruined my middle finger's eyes.

Other than that, I loved trying to re-create them and putting my own spin on them.
I even posed with one of my cute cupcake lolly jars - very kawaii!

Have you been inspired by someone else's nailart and tried to re-create it? 
I'd love to see yours


Monday, October 7, 2013

Galaxy Nails

Galaxy Nails are all over the Internet at the moment. There are lots of different ways of doing it and plenty of youtube videos to show you how to do it, My friend even did a post over on her blog.

So I'm going to show you a few pictures of what I did. The base colour was ChiChi - It's Raining men. After this was completely dry I used make up sponges to sponge on all the different colours. I used 6 different colours to try to re-create a outer space look.
The colours were: OPI - Not like the movies, Revlon - Minted, Revlon - Pink Ice, BYS - Thank god it's Friday, Maybelline Colorama - Urban Orange & BYS - Sunshine. To finish it off and give it that little something extra I added a light sparkle polish which was ChiChi - Paparazzi Princess.


As you can see I got a bit carried away and didn't take any photos of putting Orange & Yellow nail polish on but you get the idea. I used a dotting tool to make the white dots or planets/stars.


 This is the final product. I'm not as happy with this, but it was very easy so I can always try it again with different colour combinations.

Have you tried this mani before? Let me know, I'd love to see it!


Monday, January 21, 2013

Subtle Snow Nails


This is a tutorial of how I did my Subtle Snow nails for the January nail art challenge. To the left is the navy blue I used as a base colour for this mani. This is a gorgeous colour, it's from one of my favourite nail polish brands Chi Chi mainly because their colours are always brilliant and have cool names. This one is called "It's raining men".


This is a picture inside and below is a picture in the sunshine. You might be able to see there's a slight sparkle in this polish.


The next step in this mani is to paint the white tips. Find yourself a eyeshadow sponge brush or even a make up sponge. Paint the sponge with your white nail polish and then dab it on the tips of your nails and slowly work your way up your nail as shown in the below picture.


This was after one application using the eyeshadow sponge but I didn't feel it was snowy enough so I did the same things as before but worked a bit higher up the nail and made the bottom of the nails a brighter white.


So here is a picture after I finished applying the white and I was really happy with how it turned out.


The next step is to get the snowflake dots. To achieve this I used one of my dotting pens. I dripped some white polish onto some cardboard and then dipped the pen into the polish and dotted it onto my nails in a way to make it look like falling snow.


The two pictures below show you how to do it.


This is the final look after I had placed all my dotty snowflakes. I wanted to add that extra bit of sparkle to my nails so I added another one of my ChiChi nail polishes on top.


In the below picture you can see the colour I used on top, it's called "Paparazzi Princess". I took the picture out in the sun so you could see all the sparkles.


Let me know if you give this mani a try and tell me how you went.


Related Posts Plugin for WordPress, Blogger...